Showing posts with label Nature. Show all posts

Wednesday, October 29, 2014

Kentucky State Parks “Get Spooky With It”

Kentucky State Parks “Get Spooky With It”
Belinda @ Kids Matter
What’s a great combination? How about Halloween and Kentucky State Parks? That’s right; Kentucky State Parks are “getting spooky with it”! All over the state, parks are hosting Halloween events. We are invited for hayrides, crafting, reptile presentations, cookouts, trick-or-treating, haunted trail adventures, ghost hunting, and costume contests to give a few examples of what’s in store. Who can resist such great temptations? Spending time with nature and exploring the activities for Halloween. Yes, that’s a great combination!
Why is nature such an important part of our lives? "Nature is fuel for the soul," says Richard Ryan, lead author and a professor of psychology at the University of Rochester. He says, "Often when we feel depleted we reach for a cup of coffee, but research suggests a better way to get energized is to connect with nature.” Nature restores the harmony between mind, body, and soul. I think Gautham puts it best, “Everything we as humans have created has been derived from this harmony: anything from simply utilizing it efficiently to downright trying to copy its intricacies. Whenever we see the world around us becoming more and more chaotic we can look to the harmony that is nature to guide us back. The harmony that allows the whales and the sharks to live in the same ocean, the harmony that allows the wind and the trees to roam in the same fields, the harmony that allows the body and mind of all living beings to function as one.” Nature is literally the path to inner peace.
Walk hand in hand with your loved ones, steadfast into the great hope of a beautiful park covered in fall foliage. Inhale the essence that is purity in its simplest form. Disconnect from the technology that has you plugged in the majority of the day. Exhale the anxiety and tensions that have you in a choke hold. Open yourself to the possibility of enrichment and fulfillment through the anticipation of nature. Add in the excitement of celebrating Halloween in such an atmosphere and there you have it… a great combination!
Explore Kentucky; infuse yourself with the harmony found in its state parks through the essence of nature. Visit the Kentucky State Parks website to see information on Halloween events taking place in a state park near you. Have a Happy Halloween and a spooktacular time getting back to nature while you celebrate!

Wednesday, June 19, 2013

The Path Back to Nature


Following a butterfly across a field of wildflowers, lying in the grass picking out cloud animals, watching squirrels play a game of tag, or a father holding hands with his son as they walk gingerly through the woods in search of wild game are simple things that trigger fond memories from childhood. For many, sadly, this is not the case today. Somewhere, in the age of technology, our children have lost touch with nature. The closest some come to nature is the enchanted black forest in a computer game. It’s time to reintroduce our children to nature, as a family, and build memories while stimulating growth, intelligence, and physical fitness. Research has shown that regular time spent in nature facilitates better social and physical development; improves fitness, motor-skills, and well-being; supports creativity and imaginative play; inspires collaboration while reducing stress, violence and bullying; creates feelings of empathy; and supports whole-child development and learning.

The distance from nature that we have incurred as a “techno” family has triggered alarming trends in the increase of obesity, attention disorders, and even depression in our children. The 2012 Kids Count Data Statistics show that only eight states in the U.S. have a higher rate of children with one or more emotional, behavioral or developmental conditions than Kentucky. Research indicates that nature has a calming effect, and taking into account the fast paced lives that we lead, we are all well aware of the need to relax. Introducing our children back to nature is a step in the right direction toward stabilizing their emotional and physical well-being.

This is an opportunity for you to merge the worlds of nature and technology which, in turn, will take you into a whole new relaxing, yet stimulating, world. There are many sites related to nature on the internet. Here are some tips to help you learn where to start. A must stop in your search is a site by Richard Louv, author of the bestselling book, Last Child in the Woods (Algonquin Books of Chapel Hill, 2005). Louv has defined a term, “nature-deficit disorder”. This term explains exactly what occurs when limiting or removing nature from the upbringing of our children. Last Child in the Woods is part of a growing movement termed, “Leave No Child Inside”.

If you are ready to take that leap, to create everlasting memories while focusing on the mental and physical growth of your child, you are just a click away.

1. Richard Louv's website- Children and nature movement and how you can get involved.

2. Children and Nature Network - A Stronger, Closer Family.

3. National Environmental Education Foundation - Children and Nature Initiative Prescriptions for Outdoor Activity

4. National Wildlife Federation - Connecting Kids and Nature: Working towards 10 Million Kids Outdoors.

Belinda @ Kids Matter

Monday, April 9, 2012

Monday Meanderings - Nature

Last week we started touching on getting kids out in nature. This week I am including links to gardening with kids. We grow a variety of plants and my son loves it! I can also get him to try more vegetables, if he has a hand in growing them and picking them.

The Micro Gardener has a great story about a "Jack and the Beanstalk" themed garden. My son loved green beans, then he hated green beans and after eating some raw, straight from the garden, he is back to loving green beans. Give this a try!

What is that? You say that you have no space for a garden? Nonsense! Here is a great garden that Life on the Balcony made from a pallet! I love this, it takes up almost no space and is sitting on an apartment balcony.

Planet Pals has a great list of recyclable seedling containers. I love the eggshells! You could then plant the eggshells directly into the ground when the seedlings are ready to be transplanted. As I am putting the eggshells in the ground, I would probably crack the bottoms a little to give the roots a start on working their way out. While you are on their website, be sure to check out all the great recycling ideas.

I was on HGTV's website recently and saw this great pizza garden. This is a pretty large garden, but you could also do this in a big round oak barrel. It is rare for a child to not like pizza, so this is almost always a home run!

Teach your kids how to garden!

Monday, April 2, 2012

Monday Meanderings - April Showers

Well, April has finally arrived and with the coming of April, we welcome in flowers and sunshine. Do you garden at your home? I have found numerous projects that you can do with your kids to get them out in nature. In order to appreciate nature, a child has to be involved in nature. Here are some projects to get you started.

First up is Burgh Baby with an absolutely adorable Fairy Garden. I spent a summer working in a garden center and the owner made lots of fairy gardens and even offered classes for kids. It is pretty easy. You can find a container, or just a section of your yard. Then you can build your houses, or buy small birdhouses. I have even made fairy houses out of the small single serving milk containers. Decorate any way you want, and then go to the garden center and buy small plants. I love the way Burgh Baby glued pennies on the roof of her fairy home, for good luck. I also love her fairy swing in the tree! This is a great activity for kids to scour your yard for fairy goodies like pieces of bark, twigs, twine, seashells and so much more.

Do your kids love to water the plants? My son does, but sometimes he drowns delicate plants with the force of the water hose. Need a solution? Try out the Thumb Waterer from Fun in the Making. This can be made from recycled containers (be sure to clean them well first). You can even offer up a history lesson!

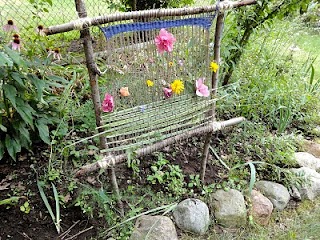
Seasonal Gnome made a beautiful garden loom. This is not only great for getting outside with nature but can really encourage fine motor skill with the weaving of items into the loom. It is also inexpensive since you scavenge the wood and then you just need twine.

My favorite is this post from Artful Adventures. Have you heard of Land Art? It is amazing. You go outside, round up some of your favorite items like leaves, blossoms, stems, rocks, etc. and then you arrange them into art. I love this fish scene. I have been on hikes before and you suddenly stumble upon a Land Art project that someone created and left. It is shocking and beautiful. Get outside and create some Land Art with your kids!

Get outside and enjoy the weather with your family! Our next Monday Meanderings will again involve getting outside with your kids.

Thursday, March 22, 2012

Bird Cameras

After I posted about the bird activities this past Monday, I started thinking about the bird videos that I used to check in on now and then. I started searching and I found a few great videos. My favorite website was Birdcam by Xcel Energy. Xcel Energy is a power company that installed these cameras around their plants. They have several different cameras and birds featured, including Bald Eagles, Falcons, Kestrels, Ospreys and Owls. The eagles and owls have already begun nesting for the season and you can see their daily behavior on the videos. The falcons, osprey's and kestrels will not begin nesting until a bit later.

Take a few minutes to relax, sit down with your child and introduce them to birding. It is not going to be a regular daily event to see these birds up close and personal, like you can in these videos.

Monday, March 19, 2012

Monday Meanderings - Birds

When it is time for Spring to arrive, my mind turns to birds. The birds start arriving from their "winter homes" and the immediately start settling in and building nests. To celebrate this, I thought we would focus on some bird activities this week.

First we have the blog, Whatever, with an adorable bird in a nest craft. I love the use of a paper plate for the entire background. I also like the fact that they used multiple items to make the nests, just like a bird would.

Here is a link to Colorado State Parks, where they teach you how to make a bird bath with a wreath and a plant saucer.

Want to make a bird feeder? Here is a great one made with Popsicle sticks. This idea comes from Tonya Staab.

Thursday, February 23, 2012

Making Bird Feeders

I have seen this idea all over the Internet and we decided to give it a try this week. It is easy and economical!

Supplies:
Cheerios or other round cereal
Pipe Cleaners

Two supplies! Now that is my kind of activity! We just threaded the cheerios on to the pipe cleaners, and bent the pipe cleaner into the desired shape.

Most of the time when I have seen this online, the pipe cleaners are bent into a heart shape. I do love those, but I wanted my son to make his own shapes. He has circles, ovals and abstract shapes.

We had lots of fun doing this and then we hung them up in the tree right outside the playroom window. We also hung some off the deck railing in the backyard. Each day, he runs to the door and window to see if there are any birds eating his cereal!

Monday, December 19, 2011

Monday Meanderings - Snowmen

Cold weather is here and as much as I already miss summer, I love snowmen. Real snowmen or fake snowmen, I love them all.

Enjoy some of the great snowmen that I found online.

First, we have The Frugal Teacher with a great expiriment documenting the lifecycle of a snowman! I think this is an amazing idea and as soon as I can clear out some space in my freezer, we are doing this.

The Idea Room made the cutest snowmen out of powdered sugar donuts. This would be adorable on the table when the kids wake up. Imagine how excited they would be, especially if school was called for a snow day too!

This is Olympia, the world's tallest snow woman. She was built in Bethel, Maine, she is 122 feet and 1 inch tall and was built in 2008. When they built Olympia, they beat thier own record of tallest snowman. They had built one in 1999 that had previously held the record. Olymia's eyelashes are skis, her lipstick mouth is made of tires that are painted red, her arms are actual trees and her scarf is 100 feet long.

Do you know what these are? They are bread ties that have been painted to look like snowmen. Get all the details at Crafts by Amanda.

Now, I love a big snowman, but there is nothing cuter than a snowman in miniature. These are from Martha Stewart and are 8 - 12 inches tall. We usually make mini snowmen to sit on the garden wall in our yard. They look cute all lined up and each scarf is a different color.

Stay warm, but make some snowmen soon!

Friday, August 12, 2011

Lost Ladybug Project

Do your kids enjoy science? Would they be interested in helping out the Entomologists at Cornell? This is your opportunity to contribute to a real scientific study and teach your children the impact that all people have. In the past 20 years the number of native species ladybugs has been declining rapidly and the non-native species are becoming more abundant. The rare species are the two spotted and the nine spotted ladybugs. The shift has occurred as people have imported ladybugs for bio control. There was such demand for ladybugs that they have now shifted in nature and the Asian species are more common that the natives. The researchers at Cornell are working hard to figure out the drastic change and what must be done to get the ladybug system back into balance. Please help out by going to their website. The Lost Ladybug Project is an important bit of research being done shoulder to shoulder with children, parents, and scientists.

Ladybug History

Some believe that ladybugs were given their name in Europe after the red robes of the Virgin Mary ("Our Lady") or because farmers believed they were sent to them by "Our Lady" to save the farms from the "ravages of pests". They were originally called "The Beetles of Our Lady" and that was eventually shortened to "Lady Beetles", which they are commonly called now.

Ladybugs are predators and a gardener's best friend. They feast on primarily aphids. Even in the larval stage they will consume aphids and other soft body insects such as mites and white flies. All of the insects consumed by ladybugs are considered pests in gardens. If you find ladybugs in your garden you can rest assured that they are eating these pests and you will not have to resort to chemical use.

Ladybugs hibernate in the winter and they prefer to hibernate in groups. They will frequently get under the siding of a home and sleep away the winter. During hibernation they will consume their own body fat to survive. Have you ever found a ladybug in your home? Often times they will be hibernating the warmth inside your home will awaken them, They then travel towards the heat and right into your home. Sadly many of the ladybugs that wake up mid-winter and go into our homes will not survive. Ladybugs need humidity to survive and to stay hydrated. Most homes are very dry in the winter causing the ladybugs to dehydrate.

When ladybugs are frightened they will leave a small yellow substance in their wake. This is not a waste matter, instead it is their blood. When they are frightened they will pull in their legs and pretend to be dead. To keep up the look of death they will release a bit of blood  from their legs by way of "reflex bleeding". Many of their predators find it to be foul smelling and will not consume them.

The Lost Ladybug Project is a great way to get involved in science and the website is a wealth of information. There is a teaching section with lesson plans, identification tools, and so much more. Get involved in Science!

Tuesday, July 12, 2011

Life Cycle of a Snake

We recently read another of our books in the Life Cycle Series that I purchased. This time we read
Green Snake (Life Cycles) by David M. Schwartz. I still highly recommend this Life Cycle series. We love that there are actual photographs in the books instead of just illustrations.

After reading the book we decided to do a few activities.

First we talked about how most snake species lay eggs instead of giving live birth. We also discussed how snake eggs are not hard like a bird egg. They are more leathery feeling and have some give to them.

We then did an experiment to see how they feel. Since I do not care for snakes and have no desire to go on a snake hunt, we used a chicken egg. I hard boiled two regular chicken eggs. Once they were ready, I put one in the refrigerator and the other I put in a bowl and covered it with white vinegar. We let the eggs sit in their respective spots for 24 hours then we pulled them out to look at them again.

The egg that had been in the refrigerator looked and felt exactly the same as it had when we put it in there. The egg in the vinegar though, had taken on a new consistency. Instead of the shell being hard, it was more flexible. We could squeeze the shell without it cracking and it actually bent in under the pressure of our fingers. My son was fascinated by this.

Why this works: The eggshells are made of calcium carbonate and when the acid of the vinegar touches the calcium it causes a chemical reaction, which you witness with the bubbles coming from the egg in vinegar. The reaction will continue with the calcium turning into carbon dioxide (the bubbles) until the calcium is used up (about 24 hours). Now that you have this soft shelled egg, what do you do with it? Well, you can extend the experiment by leaving the same egg out on a table over night. The next day the eggshell will be hard again. The reason is that it stole the carbon dioxide that we breath out of the air.

The next thing we did was an exercise for fine motor skill development. I cut up numerous pipe cleaners/chenille stems into a variety of sizes and put them in a container. My son had to use tweezers to pick up the "snakes". Once he picked them up, he used the tweezers to sort them a few different ways: by color and by size. He loved doing this and was quite adept at using the tweezers.

Once we had sorted the "snakes" we graphed them a few ways: Longest to shortest, color wise and then how many of each color we had.

Have a great time studying snakes at your house!

Thursday, June 9, 2011

Children's Garden

Metal Fence with Cutouts from Children's Artwork

I recently had the pleasure of interviewing Marcia Farris, Director of the Arboretum in Lexington, KY. If you live in the area then I am sure you have visited the Arboretum numerous times but I was interviewing Marcia for something very special. They have opened the new Kentucky Children's Garden. My family made a visit to the Arboretum the day of the grand opening and we were excited to see the diversity offered in the Children's Garden.
The Butterfly Garden

Marcia was kind enough to take some time out of her busy day to sit down and discuss exactly how this garden came about and what the plans are in the future.

In 2004, the Arboretum hired Herb Schaal of Fort Collins, Colorado to be the conceptual designer of the garden. Once they discussed all the options and were able to narrow down the choices, they began fundraising to make their dream a reality. As of 2011, they have raised $1.2 million of the needed funds and only have $80,000 more to go for completion.
Spider Labyrinth Garden

This dream came about as more and more families came to the Arboretum for walks, family time and classes. The Little Sprout classes offered at the Arboretum were filling up and the staff was being forced to turn away children that wanted to enroll in the classes. They knew that the interest in outdoor and environmental activities could be sustained and that the 25 square foot garden plot that was currently being used as a Children's Garden was inadequate for the volume of visitors.
Pond with Rock Path Bridge

The new Children's Garden is situated on 1.85 acre of the Arboretum and provides an environment for hands on usage, exploring and learning for kids aged 2 and up. There are areas to get in a creek, plant flowers, crawl through butterfly antennae, walk through a labyrinth and so much more.
Pathway with Fossil Imprints

They currently have installed a butterfly garden, a birthday garden, a creek and pond area, a spider web labyrinth, tall grass prairie, Native American area and a cave. Once more funds are raised they are also planning a few other things like a short grass prairie, Pioneer garden, transportation garden and fairy garden.
Native American Garden

As you go through the garden paths you will see animal tracks and leaves imprinted in the paths. These tracks are a history of our state and the animals that have been in our area. At every turn there is something to learn, whether parent or child. They have great raised beds that include a sensory area with soft plants and smelly plants; a barnyard garden with plants named after barnyard animals and an Alice in Wonderland Garden that contains the plants Alice encountered (minus the talking).
The Cave

If you have not visited the new Children's Garden I hope you will put it on the list of things to do this summer.

Friday, May 13, 2011

Hummingbirds

If they have not arrived in your area yet, hopefully they will be there soon. We love hummingbirds here and will frequently lay on my bed and watch them at the feeder right outside my window. We also have another feeder that actually attaches to the kitchen window but they are pretty skittish with us so close to them.

We fill the feeders frequently with our homemade sugar water. Mix 1 part sugar to 4 parts water and bring to a boil. Once the sugar has dissolved, allow to cool before pouring into your feeders.

In addition to our feeders we also try to grow plants that the hummingbirds enjoy. On 5/3/11 we posted how to make seed tapes and one of the seed tapes we made is for the hummingbirds. They love the Red Cypress Vine we planted. They also like the White Cypress Vine but the red really draws their attention. In addition to these plants we also have:

Cardinal Flower
Beebalm
Blue Lobelia
Giant Hyssop
Coral Bells
Columbine
Petunia
Nicotiana
Hostas
Butterfly Bushes

Get outside and plant some things to bring hummingbirds into your yard. They are amazing animals:

Hummers can fly 25-30mph.
Their wings move in a figure 8 when flapping.
They lay 2 eggs, each about 1/2 inch long. That is a tiny egg.
They can not walk as their feet are too tiny. Their feet are only food for perching so even if they want to move 6 inches, they must fly.
They consume 50% of their body weight each day!
Hummingbirds flap their wings from 50-200 times per second!
There are 17 species of Hummingbirds in North America. In Kentucky we get the Ruby Throated Hummingbird.
They must eat constantly and could actually starve to death within one hour.
Hummingbirds are very territorial and will even take on much larger birds to ensure food and safety for their young.
The Bee Hummingbird is the smallest bird in the world and measures in at only 2 inches long.
Hummingbirds are the only birds that are eaten by an insect. If a praying mantis catches a hummingbird it will eat it.

Tuesday, May 3, 2011

Tuesday Teaching - Fine Motor Skills

Making Seed Tapes!

Well, Spring is going strong around here and we have had so much rain that we have not even been able to plant seeds or flowers outside yet. Since I had some seeds sitting on the table and I wanted my son to help me plant them I thought it would be a great time to work on his fine motor skills.

You can sometimes buy pre-made seep tapes but often times they will also contain some weed seeds. It is a breeze and very inexpensive to make your own custom seed tapes though.

Supplies:
Flower, Vegetable or Herb seed packets of your choosing
Paper towels or newspaper, cut into strips about 1 inch wide
Flour - very small amount needed
Water - very small amount needed
Cotton swabs
Wax paper


Put a small amount of flour (about a spoonful) of flour into a small bowl. Add a small amount of water and stir to get the lumps out. You are looking for a glue like consistency. We did use our little whisk to get the lumps out. Once you have that ready, open up your first packet of seeds.

Lay a piece of wax paper over the surface that you will be working on to keep your seed tapes from sticking to the table surface. Read the seed packet to see how far apart your seeds should be planted. I show my son this distance but he gets excited and does not always stick to the recommendation but that is okay. Now use the cotton swab and dip it into the flour glue. Dab it onto the paper towel. You do not need a lot of flour glue for the seeds to stick, less is better. Once you have a glue spot, lay a seed on top. Repeat this for all of your seeds.

We used Red Cypress Vine, White Cypress Vine and Passionflower seeds with no big problems. The Poppy seeds however were TINY! What we did with those is I would just have my son push his finger down into the seeds and the ones that stuck to his finger would be put on each flour glue spot. As you can see, there are several on each flour glue spot but there was no other way for him to get the seeds on the seed tape.


Once you have done all of your seeds, label them somehow. I used a Sharpie and it was hard to write on my paper towel but it is good enough for me to remember for a day or two. Now let the seed tapes dry. Once they are dried, they can be rolled up and put into envelopes of you can not plant them soon. If you can plant them soon, just dig a hole as deep as recommended on the seed pack and lay your seed tape in the hole. For us, we will be planting the Cypress Vines in pots to set on the deck but the other seed tapes will be planted in the flower beds.


Have a great Spring! Get outside and enjoy some time with your kids and with nature.

Monday, March 21, 2011

Monday Meanderings - Spring

Spring is in the air so I thought this would be a great time to list some Spring fun and activities for everyone. Hope you can find something fun and valuable in these plans.

My Mommy Makes It has a great tutorial on making a window greenhouse for the kids. She shows a couple of different types.


Busy Bee Kids Crafts has a very cute 3D caterpillar project using craft supplies that most people always have on hand.


Lastly, The Mama Dramalogues has a cute bug catcher for the kids to make. Every kid likes to catch bugs but the Mamas do not want the critters crawling all over the house!

Friday, March 18, 2011

Animal Tracks

Take some time this weekend and get outside with the kids. Teach them about the local wildlife in your area. Even if you just go to a local park there are probably going to be some animals that have left tracks. Below are some great links for animal track information. Find the animals in your area and see if you can find tracks for them.

If your kids are very young start with the basic art of making prints at home. Give them some paper, crayons, markers, paint, stamp pads and play dough. The kids can trace their hand and foot prints, make fingerprints with the paint or stamp pads. Make a round disc with the play dough and make an impression of their own hands and/or feet. Once they understand about their own hand and foot prints, hand them some small plastic animals and let them make impressions of the toy's feet in the play dough and look at it. You can also see our blog post of September 3, 2010 where we showed how to make homemade fossils.


The photo above is a dinosaur footprint, you will not find these but it is a good picture to show the kids.

Next, head outdoors to find some real animal tracks. If you find some good tracks in the mud or sand you can even make a cast of the impressions. To make plaster casts you will need: Plaster of Paris (inexpensive at home supply stores), bottle of water, plastic spoon and bowl, paper towels, small trowel and a bag to carry your supplies in. Once you find a suitable track, pour about 1/2 cup Plaster of Paris in the bowl and add enough water to make it pourable but not too runny. Use your spoon to mix it up. Once it is mixed, tap the sides of the bowl to get the air bubbles out. Next you will want to spoon the mixture into the impression and let it set up for about 30 minutes. Next, use a small trowel to dig under and around the impression. Take it home and allow it to dry overnight. The next day you can brush off the dirt or sand. To get a really good look at it, the kids may prefer to paint the impression. The paint will go into the little lines and really bring out the details of the impression.


Next, I looked around online and found some great animal track pictures at Bear Tracker's Animal Tracks Den. Above is a picture of the front and hind feet of a gray squirrel. You can just pick the type of animal and the animal's name and she shows you the tracks. This is a great resource to use to print out the tracks and compare them to any you may see near your home.

Thursday, December 2, 2010

Homemade Gift - Memory Game


I was in Hobby Lobby recently and bought some stamps with a coupon I had. I decided to use the stamps to make my son a memory game for Christmas.

I stamped each picture on two different rounds discs. My discs are about 2 inches round. I just used black ink to keep them simple looking. It would also be easy to draw pictures in the discs. I drew on the sun and crescent moon.

I am pleased with how these turned out and they will make a very cute gift for my son. I went with a nature theme but it would be easy to make them with trucks or dolls. If you do not want to stamp the discs it would also be easy to put fabric or paper on one side of each disc. This game can be customized to match any interest your child may have.

Friday, October 15, 2010

Tissue Paper Leaves


At out office we have a die cut machine and one morning when I came in, there were several leaves and the left over stencils in one of our training rooms that someone teaching a class the prior night had left. I grabbed some of the stencils and took them home for my son & I to use.

We cut out some clear contact paper and laid it sticky side up. We then paid the square with the leaf cut out on top of the contact paper. We ripped fall colors of tissue paper and sprinkled it on the open leaf shape and then laid another piece of contact paper over the top.

It was a quick and easy activity especially since some one else did half of the work for us. The leaves could easily be cut out by hand though.

Monday, September 6, 2010

Monday Meanderings - Fall Crafts

Well, Fall will be here soon so I thought we could look at a Fall Craft Meandering today.


First up is the Frugal Family Fun blog. They made the cutest leaf necklaces. They used green leaves but as the leaves change colors, the leaves would be beatiful colors to make more necklaces with. I love this and will be doing it soon.


This link is from Wee Folk Art where they are working on a Fall Homeschool Curriculum that you can also download for free at thier site. This week they made some great salt dough vegetables. I love teh look of them and the curriculum guide is great.


This last link is from Crafts 'n Activities for Kids and I have to say, I wish I had a straw hat on me right now. He is so cute that I need one right now instead of having to wait to go buy a hat tomorrow.

Friday, September 3, 2010

Make Your Own Fossils


The other day I was talking to my neighbor that is 6 years old. She was telling me all about how she went on a hike and the great things that she saw. As she continued to talk she told me that she found a really neat fossil while hiking. She was very impressed with the fossil so that got me thinking. My son is not ready to go hiking yet but there is no reason why we can’t make our own fossils.


Supplies:

Air Dry clay

An item to be your fossil print

We molded our clay into a disk shape and then we used a small plastic dinosaur as our fossil. We just laid the dinosaur on his side on the clay and pressed him in. We then pulled him right back out and set the clay over to dry. The clay will usually need at least 24 hours to dry. Since this was not a big challenge, I guess my son felt shortchanged because he then wanted to fossilize everything that was not nailed down. We also kept the frog fossil we made but the others he wanted to continue playing with them while they were soft so no pictures of those.

Thursday, July 29, 2010

A Science Experiment


When I picked up my son from daycare a few days ago I noticed that there were lots of pine cones that had fallen from the trees surrounding the parking lot. I decided to pick up a few of those pine cones for us to use in a little experiment. Notice how wide open the pine cones are in the picture above.


We put the pine cones in Ziploc bags with about 1/2 inch of water and sealed them up. We laid them on the counter overnight. We talked about what we thought would happen to the pine cones and the water. He first said they would take a nap and then he was hoping for lots of bugs, I was not.


The next morning we checked our pine cones to discover that they had completely closed up. We pulled them out of the bags and discussed what had caused that effect on the pine cone. Why did it close? Would it open back up? Why do plants need water? Do plants need light too?


I kept one pine cone out to use as a sample of how the pines cones looked when we started the experiment, it is on the left and the one that was in the water overnight is on the right.


The second half of the experiment was to place the pine cones on the deck in the sun. After a bit, the pine cones opened right back up.

He was impressed with this experiment as it was quite visual and he only had to focus in small bursts. It is best to keep your child's age and attention span in mind when picking out a science experiment to try. My son is only 3 three so this was perfect for him.

Check out some more great experiments on Science Sunday at Adventures of Mommydom.

abc button