Showing posts with label Homemade. Show all posts

Tuesday, June 12, 2012

Tuesday Teachings - I've Been Slimed!


Who you gonna' call? Ghostbusters! I found myself humming this song the whole time we did this experiment. Please tell me that you remember that movie!

For a little Science on a Tuesday Teaching, we decided to make some slime. Since I had that theme song running through my mind, I we decided to make our slime green. I we wanted it to look just like the slime that was put on Bill Murray's character, Venkman.

Supplies:
1 tsp Borax
1 cup warm water
4 oz Elmer's White School Glue
1/2 cup water
Food Coloring (we used neon green gel)

Put one cup of warm water in a bowl, add the Borax and stir until dissolved. Set this aside.

Pour the glue into a bowl. Add the 1/2 cup water and stir.

Add the food coloring and mix until you get the desired color.

Once that is mixed well, pour in the Borax/water mix. It will start to set up immediately. Use a spoon to stir it around and then get your hands in there.

At first it will be very wet and slimy but as you mix with your hands, it will dry out some and become more of a solid.

We loved playing with this and did numerous activities with it. The slime will take on any shape, so we used our sand molds, bowls and other things to put the slime into. Next, we would dump it out on the table and see how long it would take to flatten back out.

We also wanted to see how far across the table we could stretch it, without the slime ripping.

Have fun. We loved ours and have made numerous batches since then.

Friday, May 25, 2012

Fabulous Friday - Bubble

As I was searching YouTube, I came across this great bubble video from Steve Spangler Science. I love giant bubbles and love when they do bubbles around a person.
Get out side and make some bubbles with your kids.

Thursday, May 24, 2012

Band Aids Anonymous

I have a confession to make. This is not easy for me. It torments me on a daily basis, but I hear that confession is good for the soul. Here goes: My 5 year old is addicted to Band Aids.

Shew, I feel better confessing that! We have tried everything to try and get him to stop using all of the band aids in the house. It was bad enough when he just wanted to stick band aids on his own body, but recently all of his toys have become "accident proned". Do you know how hard it is to get a sticky band aid off of a stuffed animal?


I thought about this and was trying to come up with a solution, short of having to remove the limbs from all of his toys. I have seen several instances online where people have made "toy band aids". I thought I would give that a try.

I pulled out some felt in a variety of colors, including white. I then cut a few rectangles in a variety of sizes from all the felt colors, except for the white. Next, I wounded off the corners because band aids are rounded. Once that was done, I cut some small pieces from the white felt to be the actual bandages. I glued mine on (it does not take much glue).

I then turned my son lose on his toys with his felt band aids. He loves it! Though he has requested more band aids. I told you that his toys are all "accident proned".

This was a very inexpensive project since I just used felt scraps.I made them in about 5-10 minutes.

Tuesday, May 22, 2012

Tuesday Teachings - Learning the Letters

When a child is learning the alphabet, it is not enough to merely show them the alphabet and expect them to learn it. A child has to be shown something in several different contexts in order to retain it. Before you can even teach them the alphabet, you should teach them the sounds of lettes. This lets the child understand that letters make sounds, sounds make words, words make sentences and sentences make stories. It is a natural transition. When you move onto naming letters, be sure to restate the sound each letter makes.

They need to see it, feel it, taste it, explore it. That can be intimidating for parents but there is no reason to worry. Just be sure to teach your child in a variety of ways. Don't panic, there are several ways to teach letters that are inexpensive and not overly time consuming.

First, you can show them a printed letter. Do not just show a flashcard, show them the printed letter in a variety of ways. Some examples, the aforementioned flashcard, a magazine, a street sign, etc.

Next, let them write the letter using hand over hand. If you have an easel, this is a great way to work on the letter. Put the chalk into your child's hand and then put your hand over their hand, now write your letter. If you have the easel chalkboard, this is great to work on wrist strength and an important skill for your child. After writing on the easel, you can also practice writing on a pad of paper on a table. This works the child's muscles differently and is also important to their development.

Now, pull out the play dough. Teach him how to roll out a "snake" and then work on forming the letter with your play dough snake. At my house, we have the "Roll-A-Dough Letters" from Handwriting Without Tears. This is a great product and we love it, but it is not necessary. This can easily be done at home. Our kit involves a tray, letter cards and dough. My favorite thing about the kit is that it shows you with an arrow, where to start making your letter. My least favorite thing about the kit is that the dough crumbles when you try to make it into a snake. We usually just use regular play dough.

Another tool that we use frequently is our Sandpaper Letters. You can purchase these online for around $30-$40 or you can check out Momtessori for directions on making your own sandpaper letters. She uses foam board for her background and then uses a die cut machine to cut the letters out of sandpaper. I have also seen them made with sand sprinkled over glue and with glitter glue or puffy paint. The thing I love about our Sandpaper letters is that there is a hole punched in the sandpaper to show you where to start tracing your letter. This can be done when you make them at home, or you could draw arrows with numbers, showing the direction to trace/write.

We also use our alphabet cookie cutters a lot. I do not bake a lot of cookies, but I use the cutters for anything. If my son wants cheese and sandwich meat (think homemade Lunchables), then I use cookie cutters to cut out the food. I also use them for cutting fruit or anything else. Cookies cutters are not just for cookies!

Another fun thing that we did is go around the house and take pictures of people and/or toys for each letter of the alphabet. I then assembled the pictures in an album and put the first letter of each word in the sleeve with each picture. This helps with the phonological awareness, as he already knows how to pronounce all of the items that I have taken pictures of.

Monday, May 14, 2012

Monday Meanderings - Frugal Summer Fun

Well, it is early May and the kids are already excited about Summer Vacations! I thought this would be a great time to start scouring the Internet to find some frugal family fun for Summer.

If you have not see this yet, you should get started now! Have you seen the Summer Bucket Lists? I love them! The entire family sits down together and thinks of things they want to do over the Summer. The list can be a wide list of items like: Find a new park; Sleep in a tent in the backyard; Summer reading; a Camp of your choice; Swimming; Wiener Roasts; Water balloons and on and on. Here is a link to Little Wonders' Days. She is having a linky party for Summer Bucket Lists and there are tons of ideas for activities to do, how to decorate your lists and your buckets. Check it out!

Parents Magazine has a fun summer games that only requires kids, pool noodles, balloons and laundry baskets. It looks like fun and I am pretty sure we will give it a whirl this Summer.

Next we have Filth Wizardry with a Tin Foil River. I love this idea and can not wait to do this. I need to start looking for some cool boats and fish to use in this.

While your are home and the kids are complaining that they are bored, why not challenge them to a bubble contest? Who can make the biggest bubble? Check out Design Dazzle for the top secret tips on making your bubble solution and your bubble wands.

We will be back soon with more great links! Get out there and enjoy the weather with your kids!

Friday, February 24, 2012

Homemade Marble Maze

I made this activity for my son this week. It was easy to make and just difficult enough that he had to work on it.

Supplies:
Gallon size plastic bag
Duct tape
Dish washing liquid or Hair gel
Marble or Bead(s)

I opened the plastic bag well and then I cut 4 strips of duct tape. Do not make the strips too long, they have to sit horizontally in the bag.

Now, taking one strip at a time, fold the tape strips upon themselves so that there is sticky side out all around. Put the strips in the bag, alternating the bag edge. For example, the first strip goes one inch from the bottom of the back, lined up against the right side of the bag. The next strip is an inch above the first strip, lined up on the left hand side of the bag.

Repeat this until you have all of the strips in the bag. Once all of the strips are in the bag, apply pressure to the bag to seal the tape to the front and back of the bag.

Now squirt dish washing liquid into the bag, you will have to use your fingers on the outside of the bag to move the liquid along the tape strips to the bottom of the bag. Once you have the liquid in the bag, add in your marble, zip the top of the bag and apply a strip of tape over the zip top to keep prying hands form opening the bag back up and making a mess. I will say, prior to applying the tape along the top edge of our bag, we tried it out first. I could not find our marbles, so I used a pony bead. I then thought the bead was too small, so I added about 5-6 beads.

Now, hand the bag over to your child and let them use their fine motor skills to move the marble along the maze. Encourage finger isolation, by showing them how to use their pointer finger to move the bead along the slippery dish washing liquid. We then proceeded to do this activity, one finger at a time, until all fingers had been isolated.

Thursday, February 16, 2012

Tuesday Teachings - Can You Make Plastic from Milk?

This is a great experiment. We have made chocolate milk and strawberry milk, but this time I decided to make plastic milk.

Supplies:
One cup of Milk
4 teaspoons of white vinegar
Glass measuring cup
spoon
strainer


Pour the milk into the glass measring cup and heat it in the microwave. You want the milk hot, but not boiling. We warmed it for two minutes in our microwave. Once it is hot, add the 4 teaspoons of vinegar and stir well for one minute.


Pour the milk through the strainer and into the sink. You will now see blobs of milk in your strainer. Let the blobs cool off and then rinse them with water while pressing them together.


I will tell you that I found it gross while stirring and straining but I love the texture of the completed project. Prior to that, it just reminded me of curdled milk.

Did you make plastic? Not exactly, since plastic is a bit more complicated. We made Casein. This is a by product of the protein in the milk coming in contact with the acid in the vinegar. The protein will not mix with the acid so instead, it forms blobs.

Monday, February 6, 2012

Monday Meanderings - Valentine's Day

It is the season of love! Here are some great ideas that I discovered on line. As we all know, boys are not always into the lovey-dovey gushy Valentines. These are great alternatives!


 This creative idea came from Jocelyn Murphy. She has a few other designs too. Love this!


This is from Family Fun Magazine. They always have some of the cutest ideas. I might have to hit the Dollar Store soon and look for some shovels.


Next, we have The Crafting Chicks with am idea that just made my heart bounce! You can find those balls for a very low cost!


Lastly, we have Katherine Marie Photography showing you the perfect way to recycle those candy hearts! I would love to be served my lunch in a candy heart box! Check out her blog for the pictures. She reused the large assorted box and the smaller heart boxes to serve up a meal.

Be sure to check back next week when we feature some more great Valentine's ideas!

Monday, January 30, 2012

Monday Meanderings - Affordable Gifts

Well, January is almost over and if you are like me, you have already been to a few kid's birthday parties. With your kids being invited to so many parties, it can get expensive to supply gifts to everyone. I have scoured the Internet to come up with affordable gift ideas that you can use.

First up is Teaching Good Eaters. She put together several activities but I especially love the monster kits. How fun to "build" your own monsters.

Next we have Poopscape Projects with a great homemade Shrinky Dink project. You could put together a kit that includes the pre-cut and roughed plastic and some colored pencils, along with directions on putting together pieces.

The Artful Parent has a tutorial for dying play silks using kool aid. I just love the colors and the process seems simple to follow. You can also go to Tried and True to print out a graph of mixing kool aid packages to get certain colors. Very handy and affordable.

Creative with Kids is making me flash back to my own childhood. How cute to make the Paint with Water Pages. You could make several of the pages and also give the child a couple of paintbrushes and a small lidded container to carry water in.

Well, there are a few ideas to get you started. Each birthday party that your child gets an invitation to, does not have to cause you to panic. Put together a gift that you can afford and your child will be happy to give and make for their friend.

Monday, January 23, 2012

Monday Meanderings - Shirt Designs

Well, winter is here and as I write this post, the temperature outside was 16 degrees! We need something creative to do indoors! Started looking around and we decided to look at some shirt designs.
Check these out!

First up is Family Fun Magazine with this great Slam Dunk shirt! We are huge fans of basketball in KY and this fits us to a T!

Next is Watch Me Daddy with home made muscle shirts for all of the Super Heroes in your life. Who needs the gym?

Time for Sharpie Markers to make an appearance. Did you know they had a blog? I love this tie dye done with Sharpies.

The Ribbon Retreat is up next with the perfect shirt for Super Bowl!

I love bleach pens and Homemade Mamas gives me something to do with them, other than cleaning my grout lines.

Lastly, we have PANJO with some great freezer paper stencils. These are the ones that we have already completed and I can assure you that this is easy and totally addictive! We made a shirt with a shark on it and my son loves it!

Monday, December 19, 2011

Monday Meanderings - Snowmen

Cold weather is here and as much as I already miss summer, I love snowmen. Real snowmen or fake snowmen, I love them all.

Enjoy some of the great snowmen that I found online.

First, we have The Frugal Teacher with a great expiriment documenting the lifecycle of a snowman! I think this is an amazing idea and as soon as I can clear out some space in my freezer, we are doing this.

The Idea Room made the cutest snowmen out of powdered sugar donuts. This would be adorable on the table when the kids wake up. Imagine how excited they would be, especially if school was called for a snow day too!

This is Olympia, the world's tallest snow woman. She was built in Bethel, Maine, she is 122 feet and 1 inch tall and was built in 2008. When they built Olympia, they beat thier own record of tallest snowman. They had built one in 1999 that had previously held the record. Olymia's eyelashes are skis, her lipstick mouth is made of tires that are painted red, her arms are actual trees and her scarf is 100 feet long.

Do you know what these are? They are bread ties that have been painted to look like snowmen. Get all the details at Crafts by Amanda.

Now, I love a big snowman, but there is nothing cuter than a snowman in miniature. These are from Martha Stewart and are 8 - 12 inches tall. We usually make mini snowmen to sit on the garden wall in our yard. They look cute all lined up and each scarf is a different color.

Stay warm, but make some snowmen soon!

Monday, November 21, 2011

Monday Meanderings - Thanksgiving

Well, Thanksgiving is only 3 more days away! It is time to get serious about things. Here are some great ideas for your family.

First, we have the Mostly Food and Crafts Blog with one of my favorite traditions. The "Thankful Tablecloth". You just purchase a plain tablecloth and some fabric markers and everyone writes what they are thankful for and the year beside it. What a great family memento!

Fiskars has adorable "Kid's Table" decor and directions. They may prefer the kid's table this year! I personally love the pie tin snack.

How about an Apple Turkey Snack? What a great way to get kids to eat a healthy snack! Check out Mom Endeavors for all of the details.

I love these turkey & Pilgrim bean bags from Almost Unschoolers. What a great way for the kids to work off a little energy.

We hope everyone has an amazing Thanksgiving!

Monday, October 17, 2011

Monday Meanderings - Halloween Costumes

Here are some more great Halloween costumes!

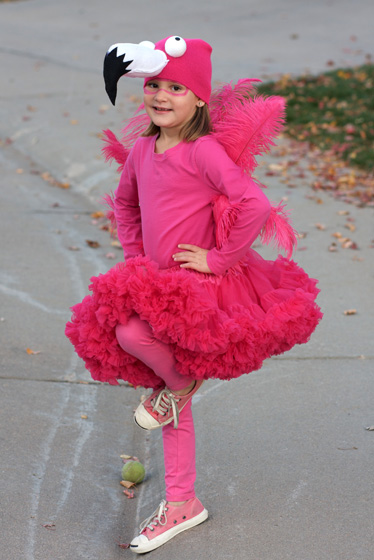
This pink flamingo costume is one of my favorites! It is made by Tangled and True. She does not post directions but it looks pretty clear cut. Pink shirt and pants, pink tutu, pink hat and pink feathers. The eyes could be Styrofoam balls and the bill, a stuffed sock with black felt on the end.

Here is a great owl tutorial from Pure Joy Events. This costume begins with a regular hoodie and is no sew! It doesn't have to be pink, it can be any color.

Parents Magazine has a great tutorial for an adorable Little Lamb. It is no sew and easy to put together.

This Lego costume cracks me up every time I look at. We can thank Family Fun Magazine for the specifics on how to put this together.

Okay, I have not looked for these balloons so I am not sure if they are affordable or not, but this was too cute not to post. Coolest Homemade Costumes has this Paratrooper on their page and I want to be this!

Thursday, October 13, 2011

Lima Bean Ghost

In honor of Halloween, we made some ghosts today with nothing but a permanent marker and some large dried Lima beans. I think they turned out adorable. Once we played with them a bit, I went back and made identicals and we turned them into a game of memory.