Showing posts with label crafts. Show all posts

Monday, October 27, 2014

Five Crafty Halloween Ideas for Children

Five Crafty Halloween Ideas for Children
Belinda @ Kids Matter
As I am all about family time, I can’t imagine a better way to kick off the holiday season than by getting “spooky crafty” with the kids. Children absolutely love to do crafts. We will take a look at five crafty Halloween ideas that will put those creative little minds to work. Craft ideas are just that… ideas… add your own little twist to them. You will be surprised what children come up with while creating their crafts. Halloween is a holiday that sticks with you throughout your lifetime. Every Halloween you remember characters you became, the fun of going door to door, haunted houses, candy, and all the decorations. Create memories with your children by participating in as many fun filled activities as possible throughout October.

Creepy spiders
Materials: Styrofoam balls, black spray paint, black pipe cleaners, wiggly eyes, orange felt, glue, scissors, and gum drops. Make different sizes and create families of spiders.
1.     Paint the Styrofoam balls black and allow them to dry thoroughly.
2.     Insert eight pipe cleaners into the ball for the legs.
3.     Cut two small circles of orange felt for the eyes and glue them onto the ball.
4.     Glue two wiggly eyes onto the orange felt.
5.     Stick a gum drop on the end of each leg for the feet.

Frankinpumpkin
Materials: One large oblong shaped pumpkin, one lime, stapler, black and green paint, white, black, and green felt, two bolts, toothpicks, scissors, glue, and dark green marker.
1.     Paint the pumpkin green and dry thoroughly.
2.     Paint black hair on top of pumpkin and dry thoroughly.
3.     Cut the lime in half and insert two toothpicks into the sides of the pumpkin where the ears will go.
4.     Place the lime halves onto the toothpicks.
5.     Paint a long black eyebrow across the forehead of the pumpkin.
6.     Cut out two oval shaped white pieces of felt for the eyes and glue them onto the pumpkin.
7.     Cut out two circles of black felt for the eyes and glue them onto the white felt.
8.     Cut out two half ovals of green felt for the eye lids and glue them on.
9.     Paint the mouth and nose with black paint and dry thoroughly.
10.  Insert a bolt toward the bottom of each side of the pumpkin.
11.  Using the green marker, draw a line a couple inches long across the forehead of the pumpkin.
12.  Using the stapler, insert several staples across the green line.

Mummy cup
Materials: Plastic cups, medical gauze, wiggly eyes, candy, scissors, and glue.
1.     Coat the plastic cup with glue around the sides leaving the top and bottom uncovered.
2.     Wrap gauze around the cup going several layers deep around the cup.
3.     Cut the gauze and glue with a drop of glue to the back of the cup.
4.     Glue on two wiggly eyes.
5.     Fill cup with your favorite candy.

Spooktacular necklace
Materials: yarn, white glue, parchment paper, scissors, and black marker.
1.     On a sheet of parchment paper, using the glue, draw an outline of several ghosts.
2.     Allow them to dry for one minute.
3.     Fill in the outline with more glue.
4.     Allow the ghosts to dry for two days.
5.     Gently peel the ghosts from the parchment paper.
6.     Using the black marker, draw eyes and a mouth on the ghosts.
7.     Punch a hole at the top of each ghost large enough to insert yarn.
8.     Cut strands of yarn long enough to make a necklace.
9.     String ghosts onto the yarn creating a necklace and tie to appropriate size.

Cup of worms
Materials: One small box of instant chocolate Jell-O pudding,  two cups of milk, one package of Oreo cookies, one package of gummy worms, and four clear plastic cups.
1.     Make the chocolate pudding according to the directions on the box.
2.     Crush Oreo cookies and sprinkle some in the bottom of each cup.
3.     Pour a ½ cup of pudding into each cup.
4.     Sprinkle more Oreo crumbs on top of the pudding.
5.     Insert a couple worms into the Oreo pudding mixture (dirt) burying them about half the length of the worm with the remaining half sticking out the top of the cup.
6.     Chill for an hour in the refrigerator and then eat.

But don’t stop here... keep that Halloween momentum going and search for other creative crafts and projects to do for the holiday. Spend quality time with your children doing things to spark their creative juices while having fun. With all projects, make sure you have a wet cloth and dry towel handy to clean up messes. Prepare the working surface before delving into a project. Make certain that any furniture near the activity is covered for protection. Dress the children in old play clothes in case of accidents. Most importantly… be patient with the children as fun can be very exciting and may lead to distractions and failure to follow instructions. Allow the children to be as hands on as appropriate for their age. During the tasks where the adult must do the work, remember to talk with the children and describe what you are doing so they learn as you work. Explain to them why an adult must do that specific task and why they should not attempt it on their own. Crafts are great teaching tools! Discuss colors, shapes, textures, counting, letters, sounds, and safety rules as you work. Have a great time with your projects and create beautiful smiles and memories as you go!

Tuesday, March 4, 2014

10 Unusual Uses for Balloons

Belinda @ Kids Matter
Have you ever found yourself with a bunch of balloons leftover after a party? Here are some ideas that might surprise you. You might even want to incorporate these ideas into your party. Let’s get crafty with some balloons!


Monday, June 11, 2012

Monday Meanderings - Father's Day

Father's Day is this weekend so here are some great ideas to make the Dads in your life happy.

First from Martha Stewart we have several great ideas. I love the decorated paper cube!

Next is, Me and My Pink Mixer, with one of my favorite photo props. We have done this before for several holidays. You can buy the wooden letters like Me & My Pink Mixer, or make them out of paper, or even make paper signs.

I Can Teach My Child made this adorable shadowbox using old ties. I love it and think it would look great on any Dad's wall!

Lastly, we have I Heart Crafty Things, with another cute photo prop. I must admit that the reason I love this one so much is that I do it with my son each year and have done it each year since he could stand. I just use the same frame each year and change out the picture. It is a great way to see the growth each year.

Do something nice for the Dads in your life!

Monday, April 16, 2012

Monday Meanderings - Farm Time

This week, I thought we could take the outdoors theme a little further with farm activities. Here are some great ones.

First up is The Diary of Dave's Wife, she had a birthday party with a farm theme for her son, which was adorable. For this segment, we will be focusing on her Barn Backdrop. I love it and she was able to make it inexpensively. How cute to set that up to play with farm animal toys!

Counting Coconuts has a great Farm sensory box. What child wouldn't want to break out singing "Old McDonald" after playing with this? She also has an amazing number of other sensory box ideas on her blog.

Here is an adorable hand print craft. Mom to 2 Posh Lil Divas contributes this. I love that the kids first paint on the barn, pond and meadow. Then they have to turn their hands in different directions for the animals.

Monday, March 19, 2012

Monday Meanderings - Birds

When it is time for Spring to arrive, my mind turns to birds. The birds start arriving from their "winter homes" and the immediately start settling in and building nests. To celebrate this, I thought we would focus on some bird activities this week.

First we have the blog, Whatever, with an adorable bird in a nest craft. I love the use of a paper plate for the entire background. I also like the fact that they used multiple items to make the nests, just like a bird would.

Here is a link to Colorado State Parks, where they teach you how to make a bird bath with a wreath and a plant saucer.

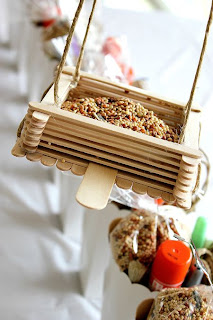
Want to make a bird feeder? Here is a great one made with Popsicle sticks. This idea comes from Tonya Staab.

Friday, February 17, 2012

Valentine Craft

Well, if you read the blog Tuesday, then you know that I cut out several hearts from construction paper. I was then left with the heart stencils and hated to waste them!

Next, I pulled out clear contact paper, the heart stencil shapes and a variety of craft supplies. My son sat down and made Valentines for family members.

I cut out a piece of contact paper and taped it sticky side up on the table. Next we laid down the heart stencil on the sticky side.

He then used the craft supplies to fill in and decorate the heart.

Once he completed one, we would put another piece of contact paper (sticky side down) on top of the heart, securing all of the craft supplies in the middle.

I then trimmed around the heart shapes and cut off the excess contact paper. Ready for gifting!

Monday, February 13, 2012

Monday Meanderings - Valentine's Day

Well, tomorrow is Valentine's Day and here are some great homemade Valentine ideas for you, just in case you haven't done anything yet!


Owls are very popular right now and this is a great play on words. I found this on Inspiration for Home.


I love this idea from The Gunny Sack. I am not sure of I could do enough for a classroom in one night but I am definitely doing this for my son! He may be afraid of popping the balloon but he will love finding something inside the balloon.


This is another favorite idea for me. Glow sticks from the Dollar Store and no candy! This idea is compliments of The Teacher Wife. She has an amazing blog!


I'll leave you with a "sweet breakfast" idea from Your Commissary Insider. If you re going to make pancakes, why not make them cute?

Happy Valentine's Day!

Monday, February 6, 2012

Monday Meanderings - Valentine's Day

It is the season of love! Here are some great ideas that I discovered on line. As we all know, boys are not always into the lovey-dovey gushy Valentines. These are great alternatives!


 This creative idea came from Jocelyn Murphy. She has a few other designs too. Love this!


This is from Family Fun Magazine. They always have some of the cutest ideas. I might have to hit the Dollar Store soon and look for some shovels.


Next, we have The Crafting Chicks with am idea that just made my heart bounce! You can find those balls for a very low cost!


Lastly, we have Katherine Marie Photography showing you the perfect way to recycle those candy hearts! I would love to be served my lunch in a candy heart box! Check out her blog for the pictures. She reused the large assorted box and the smaller heart boxes to serve up a meal.

Be sure to check back next week when we feature some more great Valentine's ideas!

Monday, January 30, 2012

Monday Meanderings - Affordable Gifts

Well, January is almost over and if you are like me, you have already been to a few kid's birthday parties. With your kids being invited to so many parties, it can get expensive to supply gifts to everyone. I have scoured the Internet to come up with affordable gift ideas that you can use.

First up is Teaching Good Eaters. She put together several activities but I especially love the monster kits. How fun to "build" your own monsters.

Next we have Poopscape Projects with a great homemade Shrinky Dink project. You could put together a kit that includes the pre-cut and roughed plastic and some colored pencils, along with directions on putting together pieces.

The Artful Parent has a tutorial for dying play silks using kool aid. I just love the colors and the process seems simple to follow. You can also go to Tried and True to print out a graph of mixing kool aid packages to get certain colors. Very handy and affordable.

Creative with Kids is making me flash back to my own childhood. How cute to make the Paint with Water Pages. You could make several of the pages and also give the child a couple of paintbrushes and a small lidded container to carry water in.

Well, there are a few ideas to get you started. Each birthday party that your child gets an invitation to, does not have to cause you to panic. Put together a gift that you can afford and your child will be happy to give and make for their friend.

Friday, January 27, 2012

Doodle 4 Google


It is that time! The Doodle 4 Google contest is up and running. If you use Google, then you know that they frequently change their logo with a great doodle. They are holding a contest that is open to all K-12 students in the US. You can click the link for the full rules and the registration form.

The best news, you can win a $30,000 college scholarship and your school can win a $50,000 grant! All entries must be postmarked by 3/20/12 and received in the Google office by 3/23/12 to be eligible. In addition to the amazing cash prizes, the winner's doodle will appear on the Google page and it will also be featured on a Crayola 64 box!

The theme for the doodle contest is: If I could travel in time, I'd visit... Get your markers, crayons, pens and pencils and get doodling!! Best of luck to everyone!

Monday, January 23, 2012

Monday Meanderings - Shirt Designs

Well, winter is here and as I write this post, the temperature outside was 16 degrees! We need something creative to do indoors! Started looking around and we decided to look at some shirt designs.
Check these out!

First up is Family Fun Magazine with this great Slam Dunk shirt! We are huge fans of basketball in KY and this fits us to a T!

Next is Watch Me Daddy with home made muscle shirts for all of the Super Heroes in your life. Who needs the gym?

Time for Sharpie Markers to make an appearance. Did you know they had a blog? I love this tie dye done with Sharpies.

The Ribbon Retreat is up next with the perfect shirt for Super Bowl!

I love bleach pens and Homemade Mamas gives me something to do with them, other than cleaning my grout lines.

Lastly, we have PANJO with some great freezer paper stencils. These are the ones that we have already completed and I can assure you that this is easy and totally addictive! We made a shirt with a shark on it and my son loves it!

Monday, January 16, 2012

Monday Meanderings - Martin Luther King Jr

Happy Martin Luther King Day! Here are some activities to do to celebrate the life and legacy of the great Dr. King!

First is First Grade in One Year with an activity showing a child's dream on the inside of the booklet and their hand print art on the outside to signify diversity.

Next we have Learning & Laughing in First Grade with a great experiment between brown eggs and white eggs. The children graphed what is different and what is the same with the eggs and then wrote out what they learned.

This is not a project that I think you can do at your home, but this is a mosaic created in 2010 by artist Pete Fecteau and is entitled "Dream Big". Can you guess what it is made of? It is 4,242 Rubik's Cubes. It took over a year of planning and weighed in at about 1,000 pounds at completion. It is amazing!

I will leave you with two of my favorite quotes:

Faith is taking the first step, even when you don't see the whole staircase. ~ Martin Luther King, Jr.
Darkness can not drive out darkness; only light can do that. Hate can not drive out hate; only love can do that. ~ Martin Luther King, Jr.

Monday, December 19, 2011

Monday Meanderings - Snowmen

Cold weather is here and as much as I already miss summer, I love snowmen. Real snowmen or fake snowmen, I love them all.

Enjoy some of the great snowmen that I found online.

First, we have The Frugal Teacher with a great expiriment documenting the lifecycle of a snowman! I think this is an amazing idea and as soon as I can clear out some space in my freezer, we are doing this.

The Idea Room made the cutest snowmen out of powdered sugar donuts. This would be adorable on the table when the kids wake up. Imagine how excited they would be, especially if school was called for a snow day too!

This is Olympia, the world's tallest snow woman. She was built in Bethel, Maine, she is 122 feet and 1 inch tall and was built in 2008. When they built Olympia, they beat thier own record of tallest snowman. They had built one in 1999 that had previously held the record. Olymia's eyelashes are skis, her lipstick mouth is made of tires that are painted red, her arms are actual trees and her scarf is 100 feet long.

Do you know what these are? They are bread ties that have been painted to look like snowmen. Get all the details at Crafts by Amanda.

Now, I love a big snowman, but there is nothing cuter than a snowman in miniature. These are from Martha Stewart and are 8 - 12 inches tall. We usually make mini snowmen to sit on the garden wall in our yard. They look cute all lined up and each scarf is a different color.

Stay warm, but make some snowmen soon!

Monday, December 5, 2011

Monday Meanderings - Winter Fun

We are past Thanksgiving and Winter is well on the way. Here are some great activities that I found online that really encourage a happy Winter.

First we have Art. Paper. Scissors. Glue. with a great bubble print snowman. I love this activity, it is a great texture to create snowmen.

Do you have a white refrigerator? Surprise the kids by turning it into a giant snowman! Got to "Crafting" my talents for all the details. If you want to spend a little more time and money, attach the pieces to magnets and the kids can do it over and over again.

Going to a baby shower this winter? Anyone can bring a diaper cake, why not bring a diaper snowman? Check out Blowout Party for the details. I love this!

Planning on building gingerbread houses this winter? Want a genius idea for the kids? Put enough supplies in muffin tins and each child gets a muffin tin to build from. No more arguing over supplies, everyone is happy!

Have a great week!