Tuesday, May 31, 2011

Tuesday Teachings - Summer Learning


Most schools are out or getting ready to let out here in the United States and kids can not wait for summer vacation. As a child, I remember the excitement and thrill I felt when it was time to finally put away the textbooks and pencils; it was time to run, play and be free! Kids need that time to just be kids but summer vacation is also no time to just forget everything they learned in the past school year.

You can give your child numerous opportunities to continue learning over summer vacation without them even realizing it.

Cook together - Let your child pick out a new recipe to try and then take them to the store to purchase all of the ingredients. This gives them opportunities to work on reading (recipes and food labels), writing (grocery list), math (measuring ingredients and timing meal) and is a great activity to do together. Research shows that when kids are involved in selecting and preparing food they take ownership of the meal and are more likely to not only try the food but to also enjoy the food.

Garden together - Go to a local garden center and give your child a set amount of money. They can then select several plants to grow in your yard or in pots. This works on math skills (spending money and spacing plants), nurturing skills (caring for the plants)and then recipes and cooking skills.

Scavenger Hunts - See our blog post of 6/4/10 for a great scavenger hunt in the grocery store and we are hoping to give another scavenger hunt sheet for the great outdoors in the next week or so. This is a great skill for kids to teach them to focus, pay attention, search and read.

Public Libraries - Our local library kicks off their summer reading program on 6/1/11. The theme this summer is One World, Many Stories. We have participated in the summer reading program every year. It is cheap, challenging entertainment that encourages literacy making it a win-win for everyone!

Art Camp - No need to pay expensive camp fees. Get together with some of your friends and organize a camp for the kids. Each day the kids can rotate the house they go to and each parent would be responsible for one day of camp. If you need some great art ideas check out Pink and Green Mama's blog for some great ideas and e-books on outdoor arts.

Make homemade art supplies - see our blog posts for Cinnamon Applesauce Ornaments, play doughChalk Paint, and Surprise Soap.

In addition the the activities listed above, also remember that "Playing is Learning"! Have a great summer!

June Calendar

Here is the Family Fun Calendar for June 2011.

Monday, May 30, 2011

Memorial Day

Happy Memorial Day! Hope everyone has a great extended week-end. Here is a link to U.S. Memorial Day History.

Thursday, May 26, 2011

The Very Hungry Caterpillar

I am lucky that my son still enjoys one of my favorite books, "The Hungry Caterpillar". We read it again this week and then we decided to make some butterflies of our own.

Supplies:
Coffee filters
washable markers
water
pipe cleaners/chenille stems
Blow dryer - if you are as impatient as we are


Use the markers to color your coffee filters. There is no need to color it entirely, unless you want to. Once you are done coloring, spray water on the filter just until it flattens out, do not saturate the filter. This will allow the color from the markers to bleed and mix.


If you are impatient, use the blow dryer to dry the filters.


Once dry, smoosh the center of the filter and wrap the pipe cleaner around it, bending the ends to resemble antennae.

See our other book and craft ideas below:
Cloudy With a Chance of Meatballs
The Grouchy Ladybug

Enjoy!

Friday, May 20, 2011

Farm Study

In preschool they have been talking about farms and my parents have a farm. My son loves to go to his grandparent's house and ride the tractor and check on the cows so this is a fun unit for him. We decided to extend this study a bit with a project at home.

I made play dough for us in green and blue. I used my standard recipe of:
1 cup All Purpose Flour
1 cup Water
1 tbsp Cream of Tarter
1 tbsp Vegetable Oil
1/4 cup Salt
Food Coloring

Add all ingredients except food coloring to a pan and heat over medium heat until the dough forms a ball. Once it forms a ball, remove to a wax paper lined counter and knead until consistency feels correct. Seperate into the number of colors you want and add each color seperately. Knead well.

Once we had the blue and green dough we took one of our art trays and covered the tray with predominantly green dough for the grass and then added blue on for a pond and stream. Once the farm was ready, we added on our farm animals and played farmer.

Thursday, May 19, 2011

Making Puffy Paint


I have seen many blogs making homemade puffy paint and we decided to give it a try this week. We used the recipe from Pocketful of Posies The only materials we needed were tablespoon, containers, flour, salt, water, food coloring, cardboard and microwave.


For each color of paint you will put 1 tbsp. flour, 1 tbsp. salt and 1 tbsp. of water in a container and add 10 drops of food coloring. Mix well. Repeat for each color. We originally made lime green, blue and red. We used a spoon to drop this onto the back of an empty food box and then swirled it around with the spoon.

Next, put the cardboard in the microwave on high for 15 second increments until it dries. It took our first picture 1 minute 15 seconds to dry.


Once we had completed that we decided to make another painting but thought we would just use blue and green and would make Earth. I really liked this one. We put the blue paint on the cardboard and used the spoon to spread it out into a round shape. Next, we drizzled the green paint on. We then put this in the microwave in 15 second increments. I took this out before the center was completely dry as I wanted to see how it would look if we just let it dry naturally, would it still puff? It was still puffy but not nearly as much as the areas that were dried by the microwave.

Wednesday, May 18, 2011

Tuesday, May 17, 2011

Tuesday Teachings - Measuring Up

It is time for another math lesson. This week we are going to focus on measuring people and items. There will be numerous items that we are going to measure but the important part is the type of items we use to measure. Our focus is going to be on standard and non-standard forms of measurement. A ruler is a great item and a child should always learn how to measure with a standard school ruler but a ruler is not always available when you need or want to measure something. We went a step further with the ruler and pulled out our tape measure also. Kids are always excited to use “Grown up Tools” that they see their parents using. My son could barely contain the excitement when I let him use the tape measure.


When you are looking for things to measure, use everyday items to increase a child’s understanding of the concept of measurement. The terms standard and non-standard are used frequently when describing measurement. Measuring with standard units refers to measuring with inches, feet, yards, centimeters or meters using a ruler or other measuring device. Measuring with non-standard units refers to measuring with blocks, pencils, hands, etc.


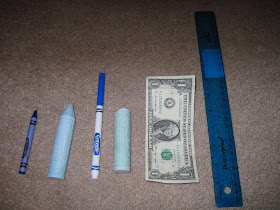
We started by measuring with our standard school ruler that is 12 inches long. I laid out several things for my son to measure that I knew were shorter than 12 inches. We measured a dollar bill (6 inches)l, a crayon (3.5 inches), a marker (6 inches) and two pieces of chalk (4 inches and 3 inches).


Each time we got ready to measure an item he would estimate how long he thought the item would be in inches. We wrote his estimate on our log and then we would measure the item and write the correct measurement on the log. After we measured the first piece of chalk he hypothesized that the second piece of chalk would have the same measurement. When we measured the second piece of chalk we found it was shorter than the first piece because we had actually used it on the sidewalk the previous day. He was surprised that it gets smaller.


After those items were measured I showed him the next items that we were going to measure: pillow (26 inches), book (11 inches), blackboard (17 inches), fire truck (18 inches) and his leg (17 inches). He again gave me his estimates for the length of each item and we recorded the estimates prior to measurement. When he started to measure he quickly realized he did not have enough rulers to measure any of these items. We talked about how when you are measuring items you need to be exact so we pulled out the tape measure and he used that to measure these items.


After these measurements were taken we sat down and talked about how other things are measured. Did you know that horses are measured by hands? We traced his hand and cut it out to measure items. One yard or three feet is the same as the distance from your nose to your thumb; that is how they measure fabric in non-standard units. We then went around trying to measure items in the house using his hand as a unit of measurement. After we measured a few items we talked about how sometimes you do not have a ruler or tape measure with you and you still need to know a measurement of on item. What do you do then? We pulled out a few items to use: Paperclips; pencils; Lego's; paper and a dollar bill. We pulled out all of the previous items that we had measured and used our non-standard units of measurement to get the length of the items. We enjoyed the non-standard units because it was fun to keep adding items on in order to figure out the length but it was also difficult to be exact.

I would call this lesson a huge success as currently we are measuring everything in my home!

Monday, May 16, 2011

Monday Meanderings - Bubble Time


When summer arrives that means it is Bubble Time! I make bubble solution in bulk in our household since we go through so much solution each time we out the bubbles. My recipe for bubble solution is 6 parts water, 2 parts dishwashing liquid (I prefer Joy) and ¾ part light corn syrup. I mix this up in an empty gallon milk jug by shaking it up. I then let the solution sit overnight to allow the bubbles to dissipate. The next day you are ready for bubble blowing. The corn syrup helps the bubbles to maintain their shape and not pop too quickly.
Here are some of the great bubble activities that I have found online.

NASA shows some great video of making bubbles without soap. While at the International Space Station the Astronauts are always exploring, even in their off time.

On Bubble Town there are instructions for making a great bubble blowing tube using household supplies.
On About Family Crafts there is a nice video about making a magic bubble wand with rope, a dowel rod, washer and bead.
On Making Memories they made bubble art. They used white paper which would look great framed but I think it would also make nice note cards. If you have plain note cards, put the bubble prints on the front and they make a nice gift.

It is also easy to make your own bubble wands using pipe cleaners/chenille stems.
Blow some bubbles with the kids and just relax.

Friday, May 13, 2011

Hummingbirds

If they have not arrived in your area yet, hopefully they will be there soon. We love hummingbirds here and will frequently lay on my bed and watch them at the feeder right outside my window. We also have another feeder that actually attaches to the kitchen window but they are pretty skittish with us so close to them.

We fill the feeders frequently with our homemade sugar water. Mix 1 part sugar to 4 parts water and bring to a boil. Once the sugar has dissolved, allow to cool before pouring into your feeders.

In addition to our feeders we also try to grow plants that the hummingbirds enjoy. On 5/3/11 we posted how to make seed tapes and one of the seed tapes we made is for the hummingbirds. They love the Red Cypress Vine we planted. They also like the White Cypress Vine but the red really draws their attention. In addition to these plants we also have:

Cardinal Flower
Beebalm
Blue Lobelia
Giant Hyssop
Coral Bells
Columbine
Petunia
Nicotiana
Hostas
Butterfly Bushes

Get outside and plant some things to bring hummingbirds into your yard. They are amazing animals:

Hummers can fly 25-30mph.
Their wings move in a figure 8 when flapping.
They lay 2 eggs, each about 1/2 inch long. That is a tiny egg.
They can not walk as their feet are too tiny. Their feet are only food for perching so even if they want to move 6 inches, they must fly.
They consume 50% of their body weight each day!
Hummingbirds flap their wings from 50-200 times per second!
There are 17 species of Hummingbirds in North America. In Kentucky we get the Ruby Throated Hummingbird.
They must eat constantly and could actually starve to death within one hour.
Hummingbirds are very territorial and will even take on much larger birds to ensure food and safety for their young.
The Bee Hummingbird is the smallest bird in the world and measures in at only 2 inches long.
Hummingbirds are the only birds that are eaten by an insect. If a praying mantis catches a hummingbird it will eat it.

Wednesday, May 11, 2011

Wordless Wednesday - Yummy

If I am not supposed to eat it, they wouldn't make it so YUMMY!

Tuesday, May 10, 2011

Tuesday Teachings - Lesson Plans

If you are looking to educate your preschool aged children at home, there are some great resources available online to make your life a bit easier. There are several bloggers who are just extraordinary at making lesson plans and providing you with the printable activities.

Check out some of these blogs for some great ideas. I have only included free lesson plans in these links.

Musings of Me has a huge selection of printables covering almost any subject or activity. Her clip art is always adorable and she does this with no charge to fans.

1+1+1=1 is another great source of printables. Most of her items are free but she does have a members only section that she uses to supplement her family income.

These are my two primary sources for printables to use with my son. Regardless of what I am looking for, one or the other of these great ladies usually has the lesson plan.

Monday, May 9, 2011

Monday Meanderings - Ocean Studies

With Summer fast approaching many families will make tips to the ocean and this is a great time to teach kids about ocean life that they will normally not see.


First we have The Wonder Years Blog with a beautiful ocean mat that you can make inexpensively at home. What a great way to teach a young child about where in the ocean animals live.

At Ramblings of a Crazy Woman they made adorable Handprint Hermit Crabs.


On YouTube there is this great time lapsed video of a starfish flipping over. It took the starfish 6.5 minutes to flip but the video is sped up to be only 39 seconds long.

Have a great week!

Friday, May 6, 2011

Neighborhood Inventory


As you take a walk around your neighborhood teach your child to be on the lookout for certain items. Our neighborhood inventory list is available by clicking here. Feel free to print out a copy and use it with a clipboard the next time you walk around your neighborhood.

I tried to make it accesible to families in large cities or suburbs by including a variety of items on the list. Have fun on your walk!

Thursday, May 5, 2011

Picnic Time


Photo Credit
The weather is clearing up hopefully and we love to go to the park for picnics. A picnic is such a low maintenance way to have a little family fun.

Supplies:
Basket, bag or backpack
tablecloth or blanket
containers and wrappers for food
cups, forks, knives, spoons
plates, napkins
trash container

Now you just need to decide on your food for the picnic. You can make sandwiches at home using your favorite toppings (we love cream cheese with jam) or you can choose one of the themes below.

Tossed Salad - Take along any of the following ingredients and toss together the salad when you reach your destination. You can put a squeeze of lemon and/or oil and vinegar for a dressing.
lettuce
spinach
endive
other salad greens
bell pepper slices - multi colors
carrot circles or shreds
tomato slices or cherry tomatoes
cheese cubes
cucumber slices
zucchini matchsticks
celery slices
sunflower seeds
bacon bits
croutons

Dip - we usually use a spinach dip, cottage cheese mixed with crushed pineapples or strawberry jam or yogurt mixed with fresh dill then we bring along some of the following for dipping.
apple rings
crackers
bread sticks
zucchini matchsticks
pickles
cucumbers
cheese slices
chunks of bread
orange sections
bananas
olives
I have to be honest, sometimes my son just uses his fingers so he gets his own bowl of dip!

Be sure to remember your drinks and do not leave any trash laying around. Take out of the park everything you brought in.

Tuesday, May 3, 2011

Tuesday Teaching - Fine Motor Skills

Making Seed Tapes!

Well, Spring is going strong around here and we have had so much rain that we have not even been able to plant seeds or flowers outside yet. Since I had some seeds sitting on the table and I wanted my son to help me plant them I thought it would be a great time to work on his fine motor skills.

You can sometimes buy pre-made seep tapes but often times they will also contain some weed seeds. It is a breeze and very inexpensive to make your own custom seed tapes though.

Supplies:
Flower, Vegetable or Herb seed packets of your choosing
Paper towels or newspaper, cut into strips about 1 inch wide
Flour - very small amount needed
Water - very small amount needed
Cotton swabs
Wax paper


Put a small amount of flour (about a spoonful) of flour into a small bowl. Add a small amount of water and stir to get the lumps out. You are looking for a glue like consistency. We did use our little whisk to get the lumps out. Once you have that ready, open up your first packet of seeds.

Lay a piece of wax paper over the surface that you will be working on to keep your seed tapes from sticking to the table surface. Read the seed packet to see how far apart your seeds should be planted. I show my son this distance but he gets excited and does not always stick to the recommendation but that is okay. Now use the cotton swab and dip it into the flour glue. Dab it onto the paper towel. You do not need a lot of flour glue for the seeds to stick, less is better. Once you have a glue spot, lay a seed on top. Repeat this for all of your seeds.

We used Red Cypress Vine, White Cypress Vine and Passionflower seeds with no big problems. The Poppy seeds however were TINY! What we did with those is I would just have my son push his finger down into the seeds and the ones that stuck to his finger would be put on each flour glue spot. As you can see, there are several on each flour glue spot but there was no other way for him to get the seeds on the seed tape.


Once you have done all of your seeds, label them somehow. I used a Sharpie and it was hard to write on my paper towel but it is good enough for me to remember for a day or two. Now let the seed tapes dry. Once they are dried, they can be rolled up and put into envelopes of you can not plant them soon. If you can plant them soon, just dig a hole as deep as recommended on the seed pack and lay your seed tape in the hole. For us, we will be planting the Cypress Vines in pots to set on the deck but the other seed tapes will be planted in the flower beds.


Have a great Spring! Get outside and enjoy some time with your kids and with nature.

Monday, May 2, 2011

May 2011 Family Calendar

Here is your May 2011 calendar. Have fun with your family. Click the picture to download.

The Sailboat Project

Have you tried Origami with your kids yet? It is a great way to be artistic and work on your fine motor skills at the same time.

I work for the Child Care Council of Kentucky, a non-profit agency in Lexington. We oversee the Child Care Assistance Program in 71 counties throughout the state and we are also a Resource and Referral Agency serving 17 counties in the state. As we were discussing the services we offer and the families that we assist in finding and paying for quality child care, it got us thinking about those families. The job we do helps these families to stay afloat in their daily lives. When you go off to a job or school, you need to know that your children are being cared for and educated.

When we looked at our records we saw that we serve 15,500 families annually. That is a tremendous amount of people but it is still "just a number". I am personally a "visual" person and 15,500 is not visual to me. I need a visual to go along with that number and that is why we began The Sailboat Project.

We are asking people to help us make 15,500 sailboats this year. That will be one sailboat for every family we serve. What a great visual to see all of these sailboats standing in for all of the families that we help stay afloat each year.

Origami paper is beautiful and easy to fold but it can also be expensive. We would love for you to fold up a sailboat with any paper that you may have available to you. If you have children, let them decorate one side of the paper and then use that to fold a sailboat. Once you have your sailboat completed, write your city and state on the back and mail it to our office at: Child Care Council, Attn: Sailboat Project, 1460 Newtown Pike, Suite 200, Lexington, KY 40511.

You can download the folding instructions by clicking the picture.


Everyone makes a difference in the world, choose to make a positive difference in the live of someone.